Release of Power BI Studio v2.0 (VSCode extension)

Due to the great feedback I have received for the first version of my VSCode extension to mange Power BI objects from within VSCode I decided to continue working on it and am finally happy to share that I am releasing a new version – v2.0!

If you already had the previous version installed in VSCode, you do not have to do anything as it will update automatically. If you are a new user, you can install it from the gallery or search for “Power BI Studio” in the VSCode extensions tab.

Besides adding some new features I also changed the name to “Power BI Studio” to make it more accessible and ease communication. While it is technically still a VSCode extension and still requires VSCode (desktop client or vscode.dev) to run, I think “Power BI Studio” is a much better term and also refers to other established Power BI tools like DAX Studio and SQL Server Management Studio which a lot of users are already familiar with.

But there are also a lot of new features – here are the most important ones:

  • Integration with External Tools in Power BI Desktop
  • Show Memory Statistics for Power BI Datasets
  • new config powerbi.workspaceFilter to filter workspaces
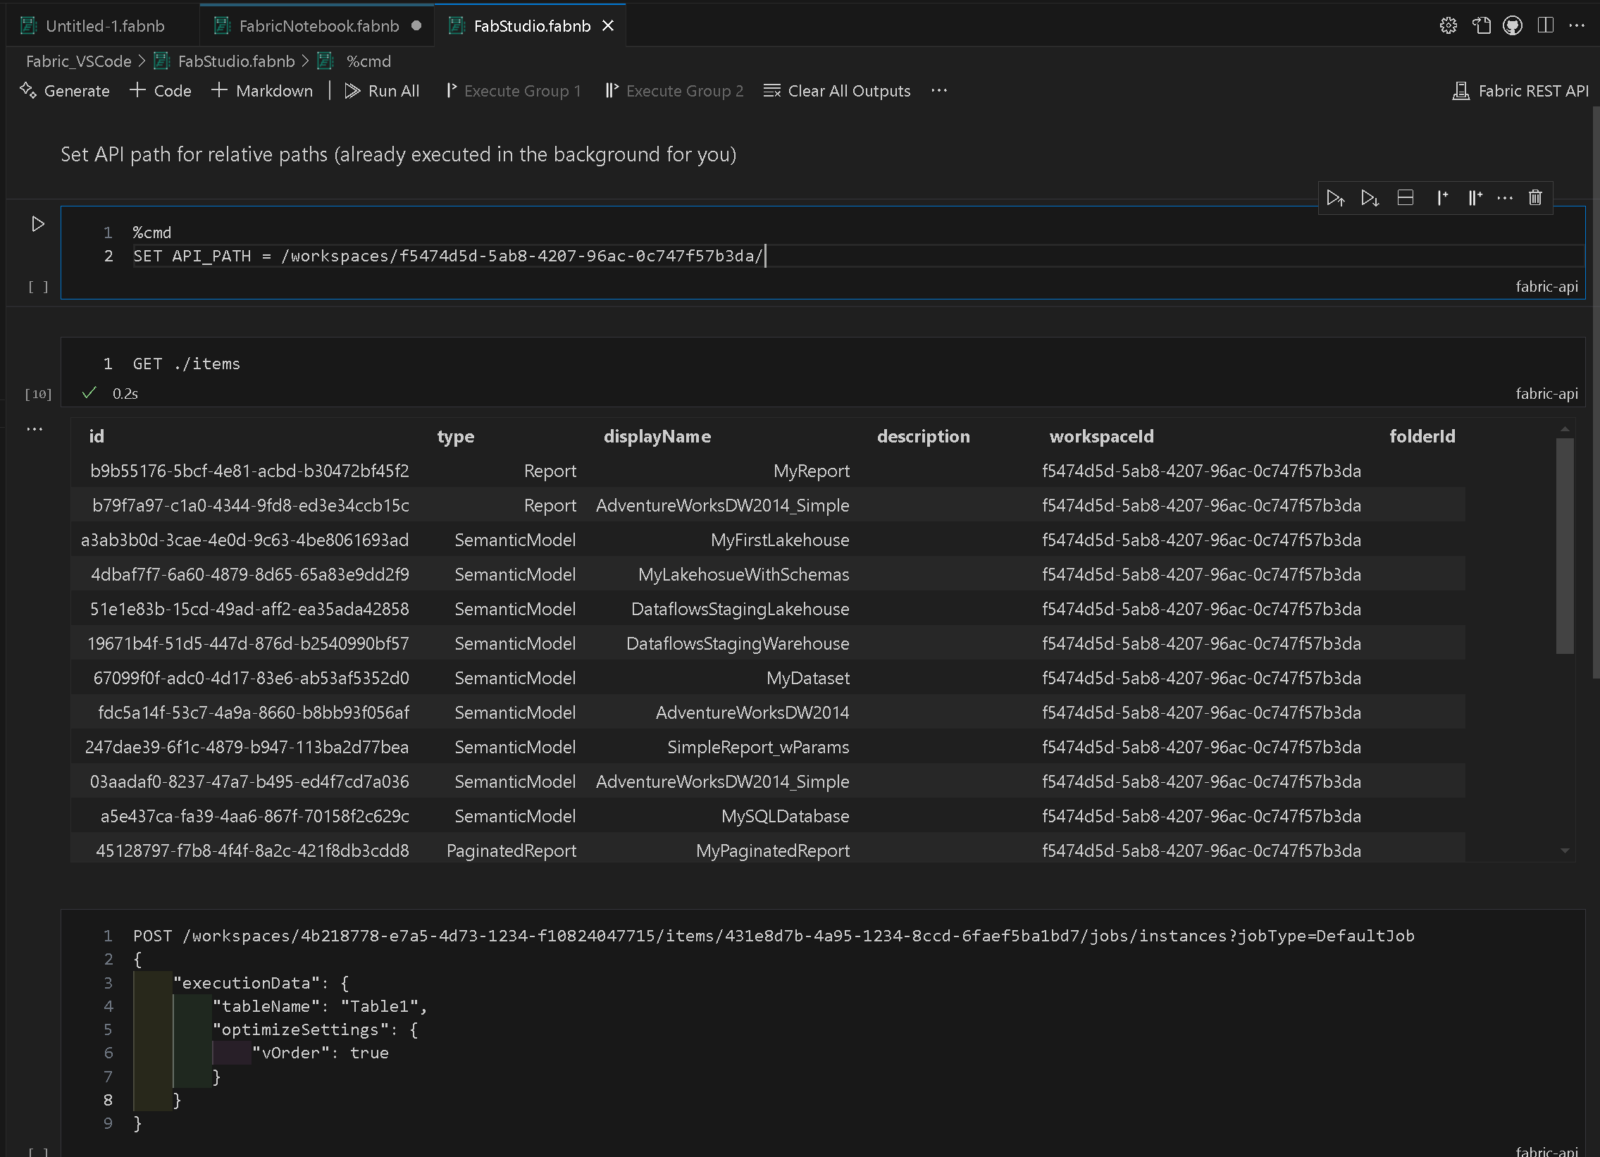
  • support for Fabric APIs in Power BI notebooks
  • a lot of bug fixes and minor improvements on existing features

Integration with External Tools in Power BI Desktop

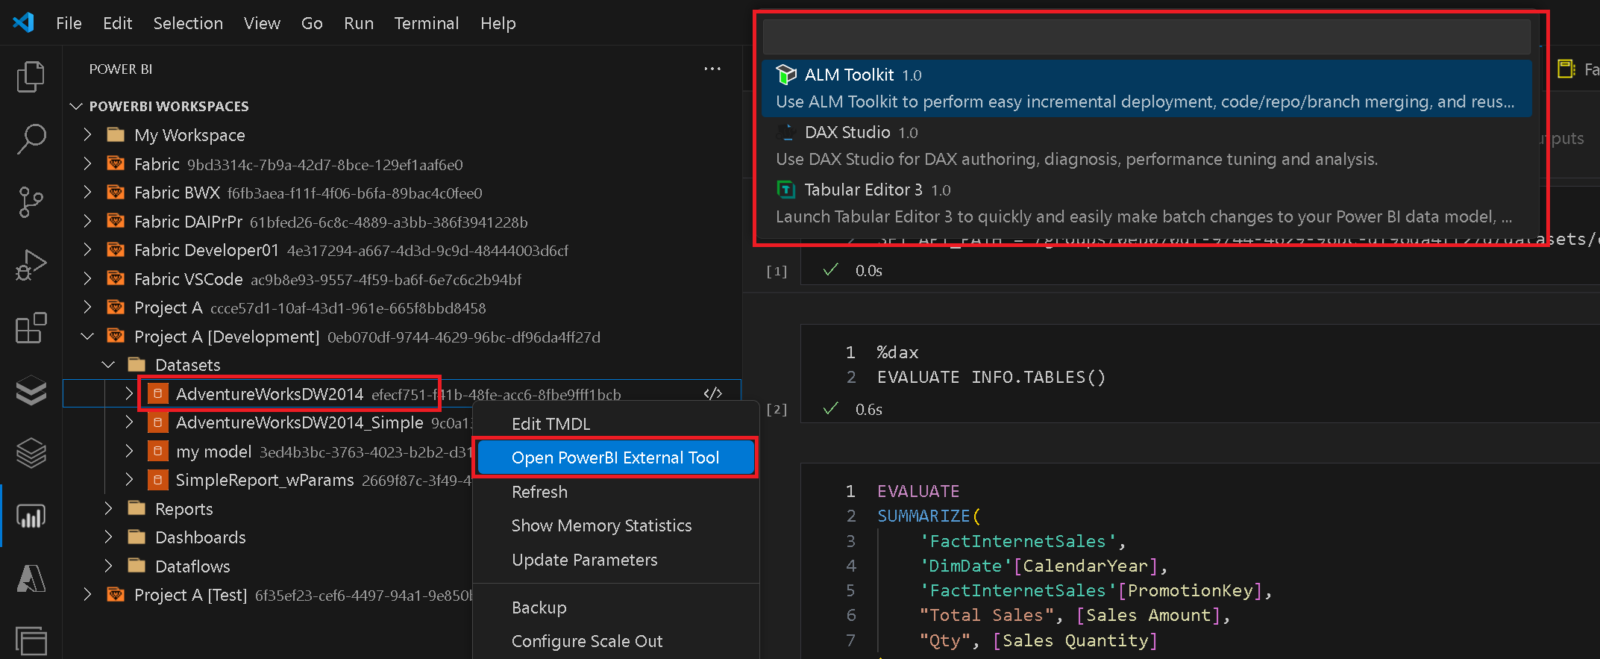
You can now start any of your External Tools you have configured for Power BI Desktop directly from VSCode to automatically connect to an online dataset. (Seriously, how often did you have to search for the proper connection string when you wanted to used DAX Studio or Tabular Editor?!)

Besides the direct integration with Power BI Desktop External Tools you can also simply copy the connectionstring from the context menu of a dataset!

Show Memory Statistics for Power BI Datasets

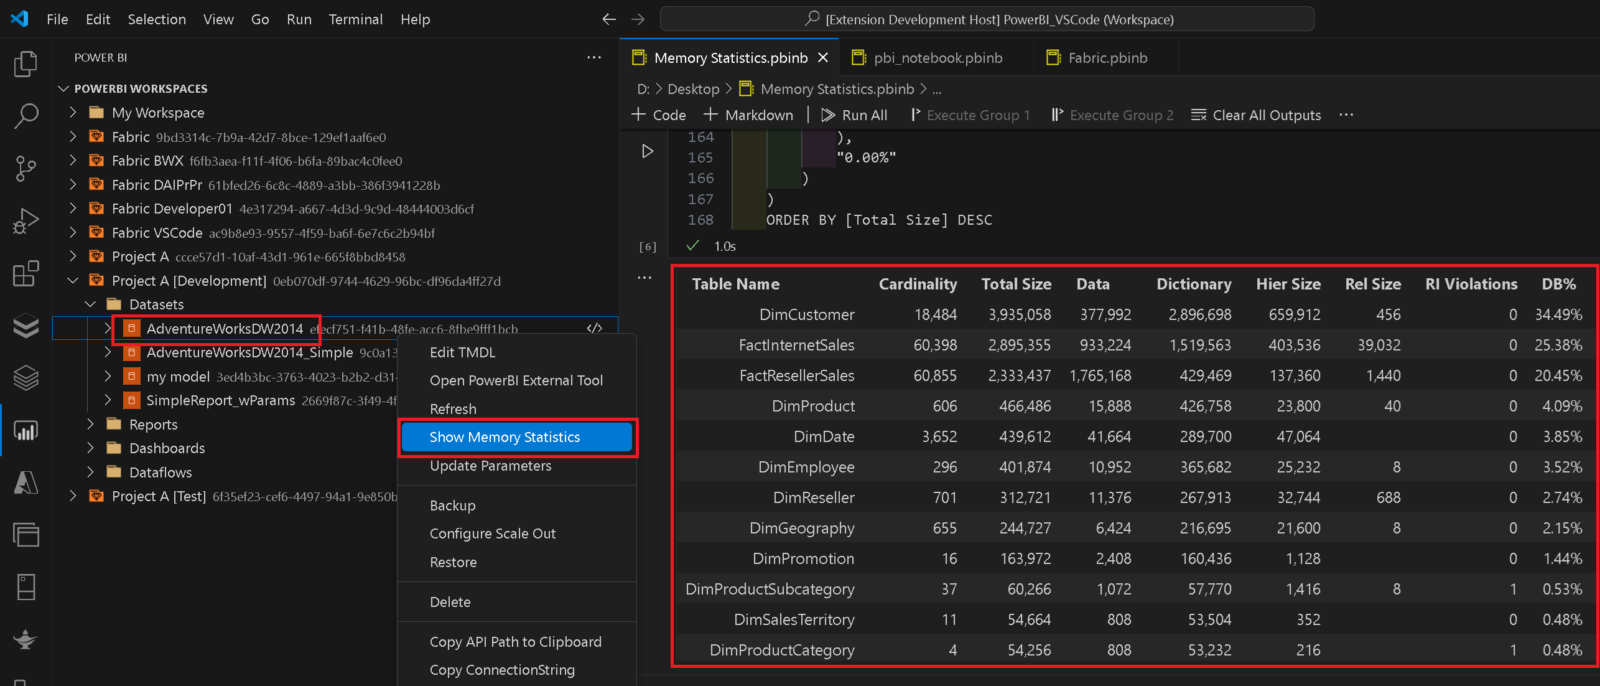
When analyzing the performance of a Power BI Datasets it is very crucial to understand the memory footprint of your model. To support admins and developers alike to investigate in memory issues, I integrated the DAX queries from my fellow Microsoft Data Platform MVP Hariharan Rajendran that exposes the memory consumption into a pre-defined notebook which can easily be opened from the context menu of the dataset:

The scripts/DAX queries will be updated constantly whenever new functionality becomes available. If you have any ideas/queries you want to have included, please reach out to me!

Other features

The new config setting powerbi.workspaceFilter allows you to use a Regular Expression (RegEx) to filter the workspaces you want to be shown in the UI. This can be very useful if you are working in a large enterprise with many workspaces and you only want to work with a small subset of them. As it is a RegEx, it allows very fine-grained and also very modular filters and you can use | (=RegEx OR) to chain different conditions. To filter for all workspaces that contain Finance or are production workspaces (suffix [PROD]) you could use “Finance|\[PROD\]”

Using Power BI notebooks you can now also query Fabric REST API endpoints.as they are using the very same authentication in the background. To do so, you need to specify the full URL of the Fabric API you want to call or use the command SET API_PATH = https://api.fabric.microsoft.com upfront. As of now the Fabric API does not come with autocompletion so you need to know which endpoints you want to call. Please refer to the official Fabric REST API documentation for more details.

GET https://api.fabric.microsoft.com/v1/workspaces

There will be some more integration with Fabric in the very near future so please stay tuned!

For all other changes/bugfixes/improvements please refer to the official documentation and changelog.

Power BI Studio will still be developed as Open-Source Software (OSS) and contributors are very welcome. Also if you have any other feedback, feature requests or simply found a bug, please file a ticket in the repository.

Visualizing Spark Execution Plans

I recently found myself in a situation where I had to optimize a Spark query. Coming from a SQL world originally I knew how valuable a visual representation of an execution plan can be when it comes to performance tuning. Soon I realized that there is no easy-to-use tool or snippet which would allow me to do that. Though, there are tools like DataFlint, the ubiquitous Spark monitoring UI or the Spark explain() function but they are either hard to use or hard to get up running especially as I was looking for something that works in both of my two favorite Spark engines being Databricks and Microsoft Fabric.

During my research I found these two excellent blog posts (1, 2) by Semyon Sinchenko who was already dealing with Spark execution plans and how to extract valuable information from them. I took a lot of inspiration and ideas from there to build my show_plan function.

In the end I wanted to achieve three goals:

  1. and easy to use function that can be used with any Spark Dataframe (including SparkSQL)
  2. a lightweight setup that works with all Spark engines
  3. an interactive, visual representation of the execution plan (still working on the interactive part)

Installation as of now is via sc.addPyFile from my GitHub repository Fabric.Toolbox. For now thats fine I think and if the function gets more popular I will probably create a PIP package for it.

sc.addPyFile("https://raw.githubusercontent.com/gbrueckl/Fabric.Toolbox/main/DataEngineering/Library/VisualizeExecutionPlan.py")
from VisualizeExecutionPlan import show_plan

Next would be the definition of your Spark dataframe. As mentioned above, you can use any Spark dataframe regardless of how you created it (PySpark, SQL, …). For simplicity and transparency I used a SQL query in my example:

my_df = spark.sql("""
SELECT fs.*, dc.CurrencyName, ds.StoreName
FROM contoso.factsales_part fs
INNER JOIN contoso.dimcurrency dc
    ON fs.CurrencyKey = dc.CurrencyKey
LEFT JOIN contoso.dimstore ds
    ON fs.StoreKey = ds.StoreKey
WHERE fs.DateKey >= to_timestamp('2008-06-13', 'yyyy-MM-dd')
""")

display(my_df)

You can now simply pass the variable that represents your dataframe into the show_plan function:

show_plan(my_df)

As you can see, the function is very easy to install and use, its basically just 3 lines of code to give you a visual representation of your execution plan!

For Databricks, the code is slightly different to missing preinstalled libraries and limited capabilities of display() function. First we need to install graphviz using %sh and %pip. This is also partially documented in the official Databricks documentation.

%sh
sudo apt-get install -y python3-dev graphviz libgraphviz-dev pkg-config

Instead of pygraphviz as described in the docs, we install the regular graphviz package:

%pip install graphviz

Adding the library and creating the test dataframe is the same as in Fabric.

sc.addPyFile("https://raw.githubusercontent.com/gbrueckl/Fabric.Toolbox/main/DataEngineering/Library/VisualizeExecutionPlan.py")
from VisualizeExecutionPlan import *
my_df = spark.sql("""
SELECT fs.*, dc.CurrencyName, ds.StoreName
FROM contoso.factsales_part fs
INNER JOIN contoso.dimcurrency dc
    ON fs.CurrencyKey = dc.CurrencyKey
LEFT JOIN contoso.dimstore ds
    ON fs.StoreKey = ds.StoreKey
WHERE fs.DateKey >= to_timestamp('2008-06-13', 'yyyy-MM-dd')
""")

display(my_df)

Finally we need to pass the displayHTML function as a second parameter to the show_plan function:

show_plan(my_df, displayHTML)

Information for the final output is take from the physical execution plan and is enriched with data from the optimized logical execution plan which for example contains the estimated sizes. Things like the type of join (e.g. BroadcastHasJoin) is taken from the physical plan.

It is worth mentioning that the sizes are based on the table statistics and become unreliable after joins are involved. However, I think they still play in import role in performance tuning so it made sense to me to also include them in the visual representation of the plan.

There is still a lot of room for improvements like installation via PIP, interactive visualization, highlighting of important things like partition filters, etc. and I could not yet test all potential scenarios (I mainly used Delta Lake tables for my tests). So I would really appreciate any feedback to make the show_plan function more robust and user friendly. Feedback is best provided via the underlying GitHub repository Fabric.Toolbox.

Announcing the MS Fabric Users Slack Channel

Are you a Microsoft Fabric user looking to supercharge your collaboration and networking? I am excited to announce the new Slack channel MS Fabric Users which I just created, tailor-made for people who want to engage with a dynamic and supportive community around Microsoft Fabric. With this channel, I want to create a space that’s built for speed, ease, and connectivity.

Why Did I Choose Slack For Communication:

I am already using different Slack channels for other technologies I use on my daily basis (Delta Lake, Databricks Users, VSCode Development, …) and when it comes to interactive collaboration, I think Slack is much more efficient in getting answers to your immediate questions than traditional forums etc. Here are some other reasons why I think that’s the case:

1. Real-Time Communication: 

Slack’s instant messaging platform means you can get answers to your questions and feedback on your projects without waiting for forum replies. Connect with peers in seconds, not minutes or hours.

2. Better Organization with Channels:

Create and participate in topic-specific channels that keep discussions focused and relevant. Whether you’re interested in theming, components, or best practices, channels make it easy to find and partake in conversations that matter to you.

3. Enhanced Collaboration:

With Slack, collaboration is not just about talking – it’s about doing. Share code snippets, files, and resources effortlessly with the drag-and-drop interface. Pair that with integrations like GitHub and Trello, and you’ve got a powerful toolkit right at your fingertips.

4. Accessibility On-the-Go:

Stay connected with the community wherever you are. The Slack mobile app provides a seamless experience, ensuring you never miss out on important discussions no matter where you work from.

5. Advanced Search Capabilities:

Slack’s powerful search function makes it easy to find relevant conversations, shared files, and announcements. No more sifting through pages of forum posts to find the information you need.

Join the Fabric Slack Community:

I believe community is key to learning and growing as a developer. By using Slack, you can enhance the way you connect, engage, and support each other as Microsoft Fabric users.

To get started, join the Slack channel today! Simply visit MS Fabric Users to sign up and dive into the conversations happening right now!

Using VARCHAR() in Microsoft Fabric Lakehouses and SQL Endpoints

Defining data types and knowing the schema of your data has always been a crucial factor for performant data platforms, especially when it comes to string datatypes which can potentially consume a lot of space and memory. For Lakehouses in general (not only Fabric Lakehouses), there is usually only one data type for text data which is a generic STRING of an arbitrary length. In terms of Apache Spark, this is StringType(). While this applies to Spark dataframes, this is not entirely true for Spark tables – here is what the docs say:

  • String type
    • StringType: Represents character string values.
    • VarcharType(length): A variant of StringType which has a length limitation. Data writing will fail if the input string exceeds the length limitation. Note: this type can only be used in table schema, not functions/operators.
    • CharType(length): A variant of VarcharType(length) which is fixed length. Reading column of type CharType(n) always returns string values of length n. Char type column comparison will pad the short one to the longer length.

As stated, there are multiple ways to define a text column and while you cannot use VarcharType/CharType in your Spark dataframe, you can still use it to define the output tables of your lakehouse. Inspired by this blog post by Kyle Hale, I was running some similar tests on Microsoft Fabric.

In general I can say that the results are basically the same as the ones that Kyle got. This was kind of expected as in both cases Spark and Delta Lake was used to run the tests. However, for me it was also interesting to see what impact this data type change had on other components of the Fabric ecosystem, particularly the SQL Endpoint associated with my Lakehouse. Here is the very simple Spark code I used for testing. I am writing a dataframe with an IntegerType() and a StringType() to a new table which will create this table in the lakehouse for you:

schema = T.StructType([
    T.StructField("charLength", T.IntegerType()), 
    T.StructField("value_max_len_10", T.StringType())
])

df = spark.createDataFrame([[(10),('abcdefghij')]], schema)

df.write.mode("append").saveAsTable("datatypes_default")

If you have a look at the table created in your Lakehouse via the SQL Endpoint using e.g. SQL Server Management Studio or Azure Data Studio, you will realize that text column is associated with a datatype VARCHAR(8000). For most columns, this is utterly oversized and can have a huge impact on performance as the size of the columns is used by optimizer to built an efficient execution plan.

Lets see what happens if we write the very same dataframe into an already existing table that was created using VARCHAR(10) instead:

%%sql
CREATE TABLE datatypes_typed (
    charLength INT,
    value_max_len_10 VARCHAR(10)
)
# writing the same dataframe as before but now to the pre-defined table
df.write.mode("append").saveAsTable("datatypes_typed")

Checking the SQL Endpoint again you will see that the data type of the column in the new table is now VARCHAR(40) – quite a big improvement over VARCHAR(8000) !

The reason why it is VARCHAR(40) and not VARCHAR(10) is described in this excellent post from Greg Low and I have to admit, reading it completely changed the way I look at string datatypes in SQL Server!

I have to admit that I do not yet know why it is VARCHAR(40) and not VARCHAR(10) but for the time being I am already happy with those results. I also tried other lengths but it seems to always show 4 times the defined length in the lakehouse table. Once I find out more about this, I will update the blog post!

Release of Power BI-VSCode Extension

Download from VSCode Gallery

I am working a lot with Power BI in my daily business and there have always been a couple of things that bothered me since the very beginning. Most of this is related to the web UI and its usability, mainly that you need too many clicks to get to where you want (e.g. viewing Datasets refreshes) but also that some features are simply not exposed in the UI that are possible with the Power BI REST APIs (e.g. rebinding a report to another dataset). So I thought there must be some better way to do this and make management and usability of Power BI easier and I came up with the idea for a Visual Studio Code extension for Power BI to close this gap.

As you may know, I have already written another VSCode extension for Databricks (Databricks Power Tools) which is basically also “just” a wrapper around the various Databricks APIs but makes various features of Databricks much more accessible, especially for people that spend most of their time in a local IDE anyway and are already used to it. At this point I also want to thank my company paiqo for supporting this engagements and making all this possible!

For about a year now I have been developing the Power BI VSCode extension and it finally reached a state where I want to release it. It has been in the VSCode market place for quite some time now but was never officially released by a blog post like this. To stay up-to-date I highly recommend to follow the repository which will always be updated to include the latest features and documentation.

So what is this Power BI VSCode extension all about and how can it help me in my daily work? There are currently three core components included which all serve different purposes:

  • Workspace browser
  • Notebooks to run arbitrary API calls and DAX
  • TMDL editor (!)

The workspace browser allows you to access all artifacts that you have access to and run the most common API calls directly from the VSCode UI. Besides features that are also available in the web UI like taking over an artifact, triggering a refresh/viewing the history or changing parameters, this includes additional features like Rebind, Clone, Configuring Query Scale Out, Update Report Content, etc. For some features you can also use Drag&Drop instead of the context menu. For example, if you drag a report and drop it on a dataset, a popup will ask you whether you want to rebind the report to that dataset or clone the report and link the clone to the dataset!

Besides the workspace browser there is also a dedicated one for Deployment Pipelines which allows you to configure Power BI deployment pipelines and also run selective deployments directly from VSCode!

There are also UIs for Capacities and Gateways, but those are mainly for informational purposes and are read-only.

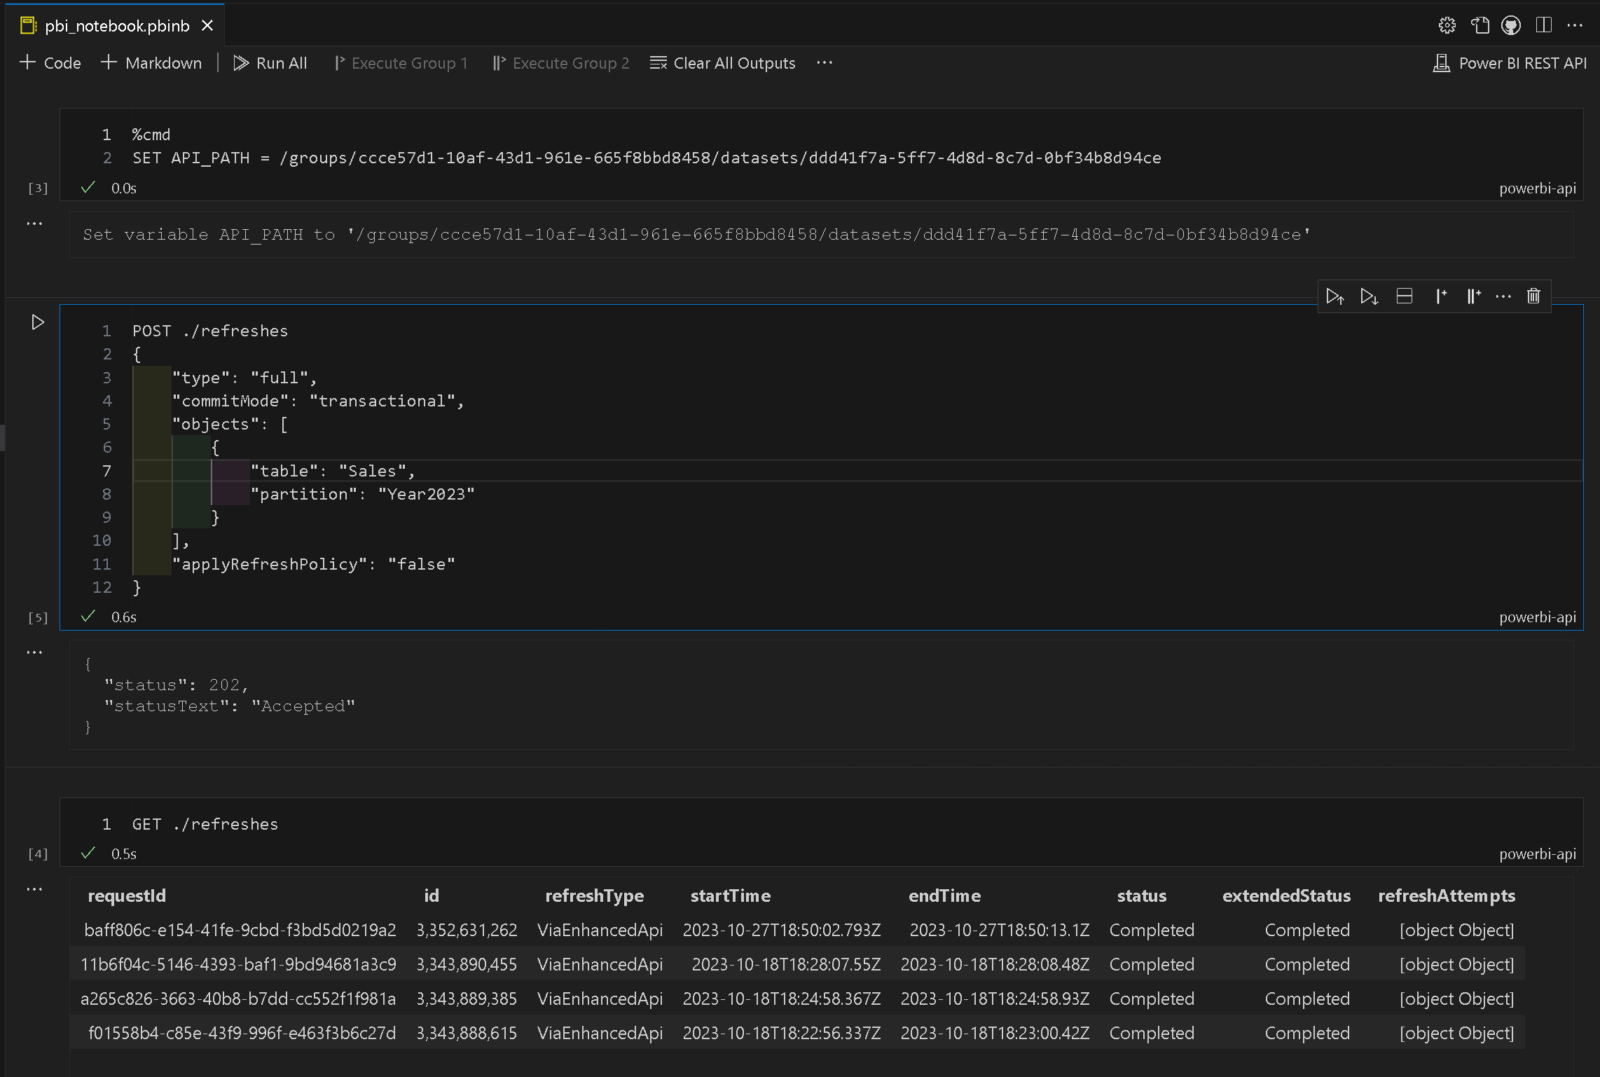
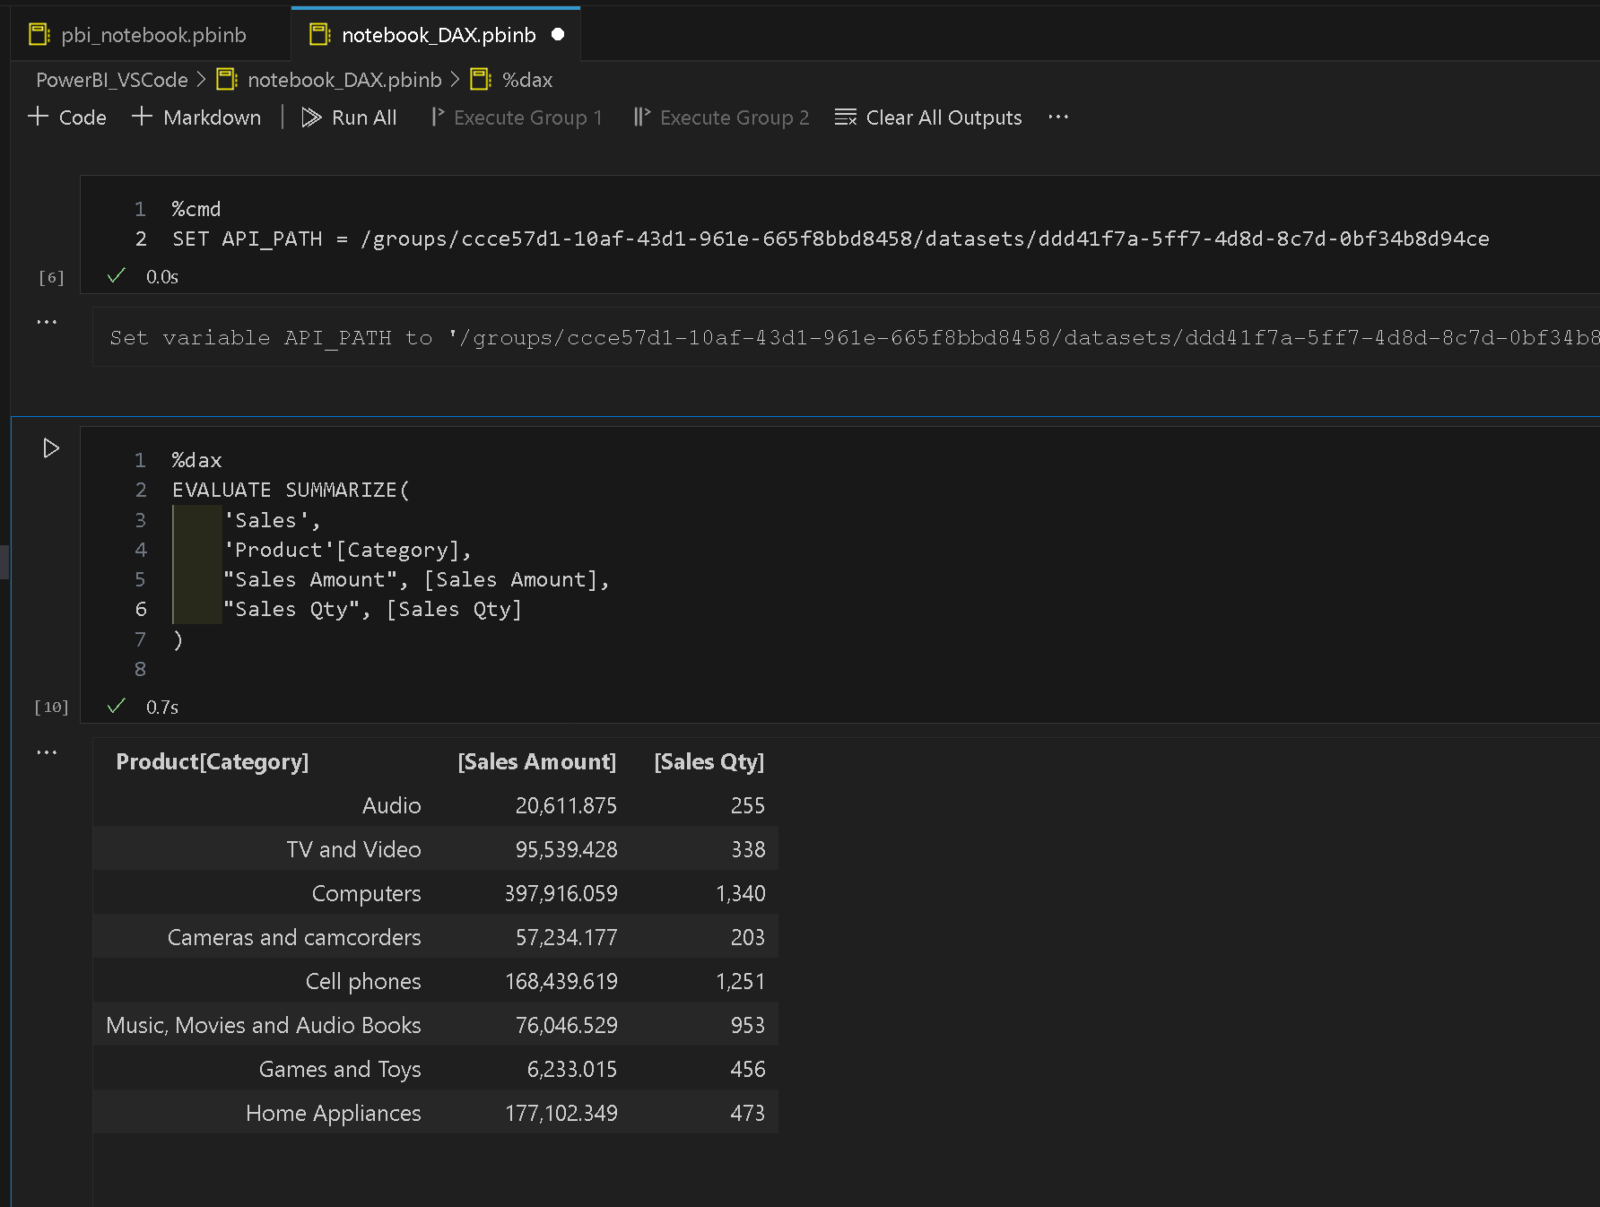
The second component of the extension are Power BI Notebooks which allow you to run any arbitrary API call . This is especially useful as not every API call can be built into the UI properly (e.g. due to too many parameters, etc.). Power BI Notebooks also support notebook magics like %dax or %cmd to run DAX queries or to set variables within the notebook. There is also intellisense/autocomplete which should help you a lot to discover and write your final API call. This also includes samples for more complex API calls like calling the Enhanced Refresh API.

To run a DAX statement via the Execute Queries API, you can simply use %dax in the first line of the notebook call and then start writing your DAX query:

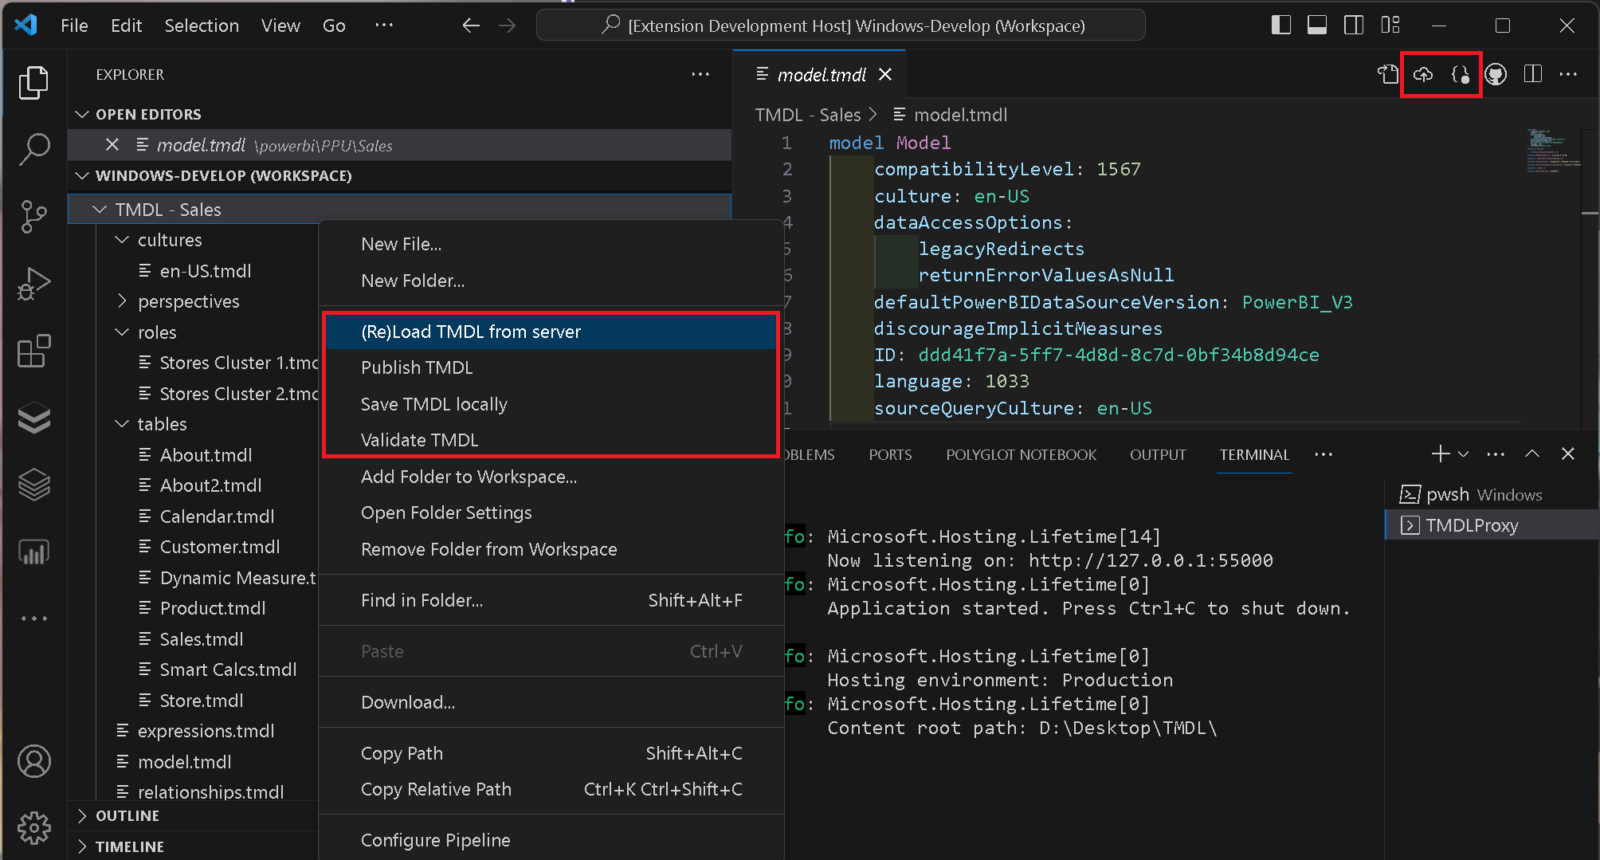
The last – but definitely not least(!) – part is the just recently added TMDL (Tabular Model Definition Language) integration, which allows you to modify Power BI datasets using TMDL. If your dataset resides in a premium capacity and the XMLA endpoint is enabled for read/write mode, you can select “Edit TMDL” from the context menu of your dataset. This will add a new folder to your VSCode workspace that represents the TMDL structure of that dataset. You can now navigate the individual .tmdl files, change them and validate them. once you are happy with the changes, you can also publish your changes back to the online dataset. The .tmdl files only reside in memory for the time of your VSCode session and will be reloaded every time. If necessary, you can also force a manual reload at any time to the the most recent version from the Power BI service.

Besides this “online”-mode, you can also save the TMDL definition locally – e.g. if you want to check it into a Git repository. The same features as described above are also available for locally stored TMDL definitions. this also includes TMDL definitions generated by other tools like Tabular Editor or pbi-tools!

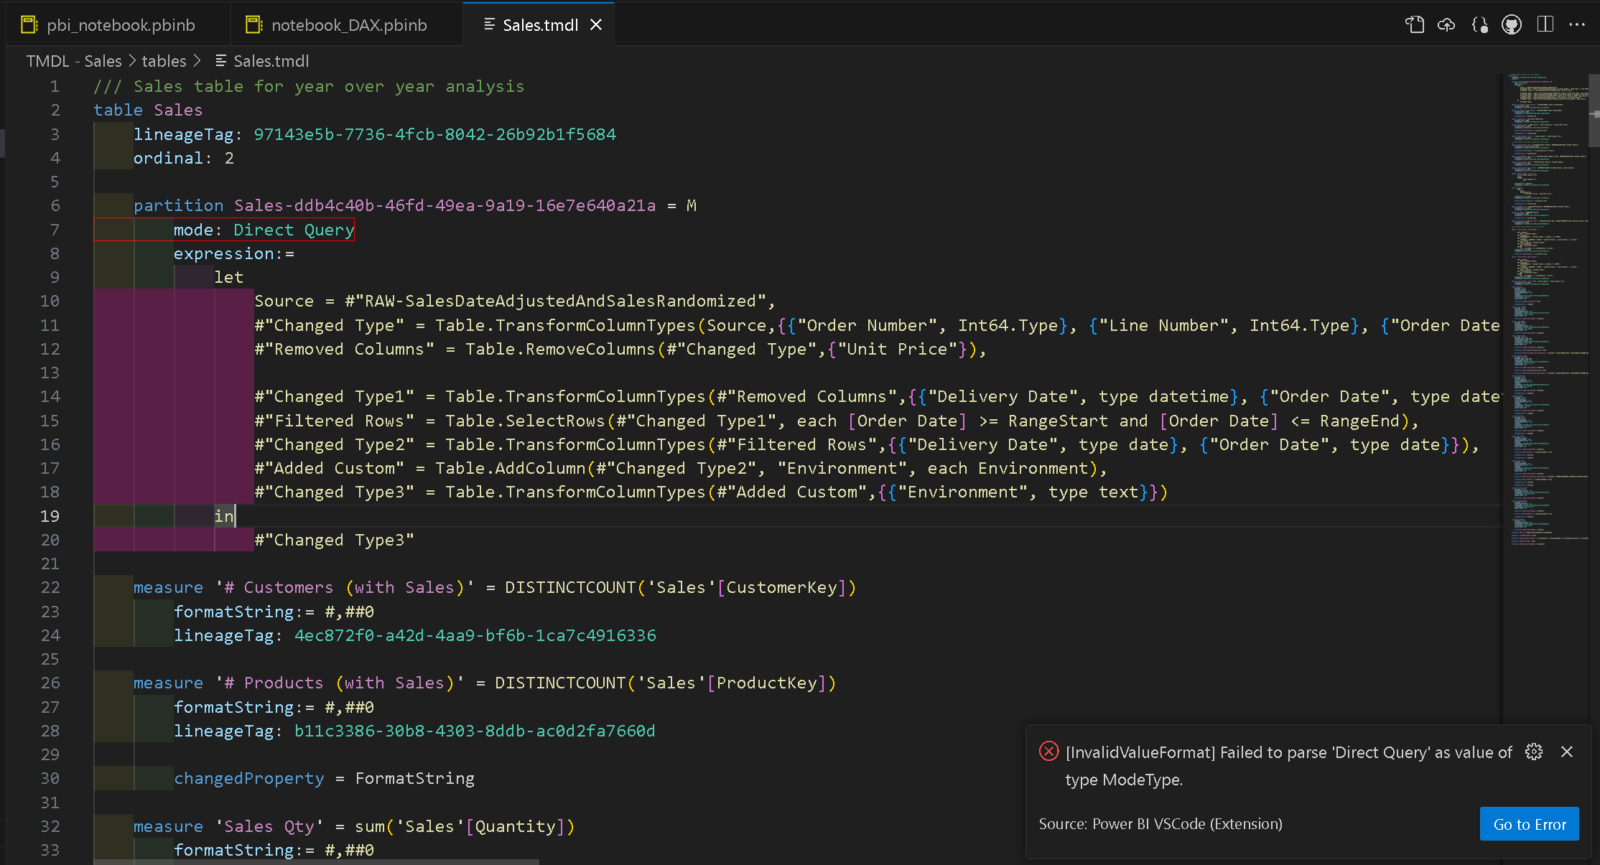
To ease debugging, there is also a [Go to Error] button if your TMDL is not valid which jumps directly to the faulty TMDL file and highlights the line with the error:

To make this all work, you need to have ASP.NET Core Runtime 7.0 or higher installed as described in the docs.

So whats next?

While I do have some new features already in the backlog, I am also eagerly looking forward to gather some feedback from the community to drive future developments. So if you have a feature that you want to have added to the extension, simply open a feature request in the repository.

Due to the open architecture of VSCode, the extension also integrates with/leverages all other extensions in the Power BI space. Though, there is not much available at the moment but I hope that his ecosystem grows and sooner or later there will be a language extension for DAX or TMDL that provides intellisense/autocomplete here too, or simply syntax highlighting for the very beginning.

As this is an open-source project, you can also contribute directly by creating pull requests. If you like the extension and make sure I don’t run out of coffee while continuously improving it you can also sponsor a cup of coffee for me to contribute to this extension.

Querying Power BI REST API using Fabric Spark SQL

Microsoft Fabric has a lot of different components which usually work very well together. However, even though Power BI is a fundamental part of Fabric, there is not really a tight integration between Data Engineering components and Power BI. In this blog post I will show you an easy and reusable way to query the Power BI REST API via Fabric SQL in a very straight forward way. The extracted data can then be stored in the data lake e.g. to create a history of your dataset refreshes, the state of your workspaces or any other information that is provided by the REST API.

To achieve this, we need to prepare a couple of things first:

  • get an access token to work with the Power BI REST API
  • expose the access token as a SQL variable
  • create a PySpark function to query the Power BI REST API
  • expose the PySpark function as a SQL user-defined function
  • use SQL to query the Power BI REST API

To get an access token for the Power BI REST API we can use mssparkutils.credentials.getToken and provide the OAuth audience for the Power BI REST API which would be https://analysis.windows.net/powerbi/api

pbi_access_token = mssparkutils.credentials.getToken("https://analysis.windows.net/powerbi/api")

We then need to make this token available in Fabric Spark SQL by storing it in a variable:

spark.sql(f"SET pbi_access_token={pbi_access_token}")

The next part is probably the most complex one. We need to write a Python function that runs a query against the Power BI REST API and returns the results in a standardized way. I will not go into too much detail but simply show the code. It basically queries the REST API via a GET request, checks if the result contains a property value with the results and then returns them as a list of items. Please check e.g. the GET Groups REST API call to better understand the structure of the result. The function further adds a new property to each item to make nesting of API calls easier as you will see in the final example.

import requests

# make sure to support different versions of the API path passed to the function
def get_api_path(path: str) -> str:
    base_path = "https://api.powerbi.com/v1.0/myorg/"
    base_items = list(filter(lambda x: x, base_path.split("/")))
    path_items = list(filter(lambda x: x, path.split("/")))

    index = path_items.index(base_items[-1]) if base_items[-1] in path_items else -1

    return base_path + "/".join(path_items[index+1:])

# call the api_path with the given token and return the list in the "value" property
def pbi_api(api_path: str, token: str) -> object:
    
    result = requests.get(get_api_path(api_path), headers = {"authorization": "Bearer " + token})

    if not result.ok:
        return [{"status_code": result.status_code, "error": result.reason}]

    json = result.json()

    if not "value" in json:
        return []

    values = json["value"]

    for value in values:
        if "id" in value:
            value["apiPath"] = f"{api_path}/{value['id']}"
        else:
            value["apiPath"] = f"{api_path}"

    return values

Once we have our Python function, we can make it accessible to Spark. In order to do this, we need to define a Spark data type that is returned by our function. To make it work with all different kinds of API calls without knowing all potential properties that might get returned, we use a map type with string keys and string values to cover all variations in the different APIs. As the result is always a list of items, we wrap our map type into an array type.
The following code exposes it to PySpark and also Spark SQL.

import pyspark.sql.functions as F
import pyspark.sql.types as T

# schema of the function output - an array of maps to make it work with all API outputs
schema = T.ArrayType(
    T.MapType(T.StringType(), T.StringType())
)

# register the function for PySpark
pbi_api_udf = F.udf(lambda api_path, token: pbi_api(api_path, token), schema)

# register the function for SparkSQL
spark.udf.register("pbi_api_udf", pbi_api_udf)

Now we are finally ready to query the Power BI REST API via Spark SQL. We need to use the magic %%sql to tell the notebook engine, we are running SQL code in this one cell. We then run our function in a simple SELECT statement and provide the API endpoint we want to query and a reference to our token-variable using the variable syntax ${variable-name}.

%%sql 
SELECT pbi_api_udf('/groups', '${pbi_access_token}') as workspaces

This will return a table with a single row and a single cell:

However, that cell contains an array which can be exploded to get our actual list of workspaces and their details:

%%sql
SELECT explode(pbi_api_udf('/groups', '${pbi_access_token}')) as workspace

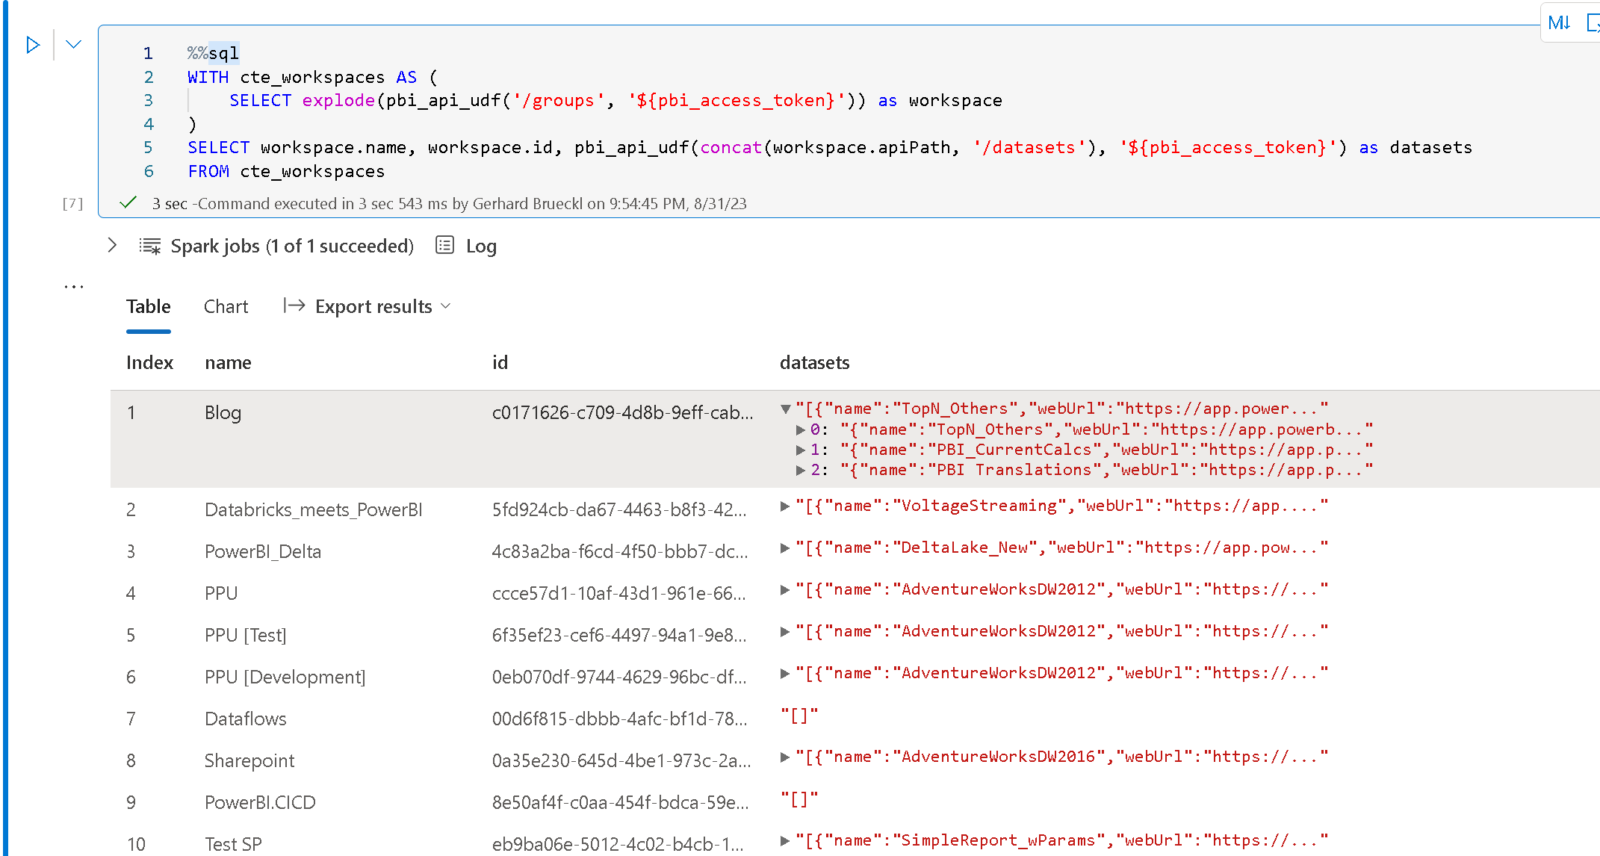
Once you understood those concepts, it is pretty easy to query the Power BI REST API via SQL as this can also be combined with other Spark SQL capabilities like CTEs, e.g. to get a list of all datasets across all workspaces as shown below:

%%sql
WITH cte_workspaces AS (
    SELECT explode(pbi_api_udf('/groups', '${pbi_access_token}')) as workspace
)
SELECT workspace.name, workspace.id, pbi_api_udf(concat(workspace.apiPath, '/datasets'), '${pbi_access_token}') as datasets
FROM cte_workspaces

As you can see, to show a given property as a separate column, you can just use the dot-notation to reference it – e.g. workspace.name or workspace.id

There are endless possibilities using this solution, from easy interactive querying to historically persisting the state of your Power BI objects in your data lake!

Obviously, there are still some things that could be improved. It would be much more elegant to have a Table Valued Function instead of the scalar function that returns an array which needs to be exploded afterwards. However, this is not yet possible in Fabric but will hopefully come soon.

This technique can also be applied to any other APIs that expose data. The most challenging part is usually the authentication but Fabric’s mssparkutils.credentials make it pretty easy for us to do this.

Databricks Power Tools for VSCode

As you probably know, we at paiqo have developed our Databricks extension for VSCode over the last years and are constantly adding new features and improving user experience. The most notable features are probably the execution of local notebooks against a Databricks cluster, a nice UI to manage clusters, jobs, secrets, repos, etc. and last but not least also a browser for your workspace and DBFS to sync files locally.

In February 2023 Databricks also published its own official VSCode extension which was definitely long awaited by a lot of customers (blog, extension). It allows you to run a local file on a Databricks cluster and display the results in VSCode again. Alternatively you can also run the code as a workflow. I am sure we can expect much more features in the near future and Databricks investing in local IDE support is already a great step forward!

As you can imagine, I am working very closely with the people at Databricks and we are happy to also announce the next major release of our Databricks VSCode extension 2.0 which now also integrates with the official Databricks extension! To avoid confusion between the two extensions we also renamed ours to Databricks Power Tools so from now on you will see two Databricks icons on the very left bar in VSCode.

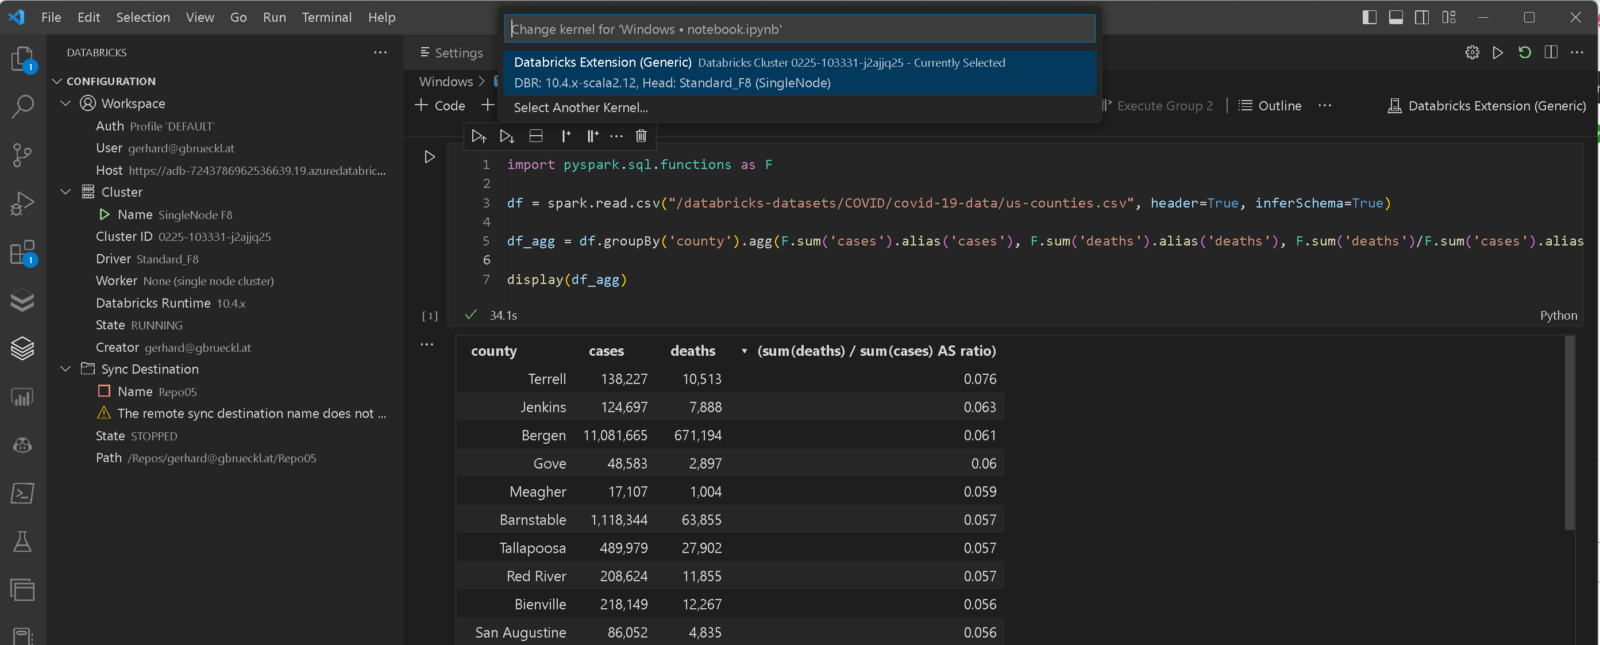
By introducing a new connection manager you can now leverage the configuration settings you already have in the Databricks extension and use them in the Databricks Power Tools seamlessly. All you need to do is to change the VSCode configuration to use the new Databricks Extension connection manager as shown below.

This is also the new default so if you have both extensions installed, the Databricks Power Tools will automatically pick up the configuration settings from the Databricks extension to establish a connection to your Databricks workspace.

If we detect that the Databricks extension is installed already, we also automatically create a new Notebook Kernel for you that allows you to run notebooks against the cluster that you configured in the Databricks extension. To change the cluster where the code runs, you can use the Cluster Manager from the Databricks Power Tools.

Besides that new integration, there are also a lot of other new features that made it into this major release:

  • File system integrations: you can now mount your Databricks workspace or DBFS directly into your VSCode workspace. This also allows you to easily drag & drop items between your local filesystem, Databricks workspace (notebooks) and DBFS!
  • A new Azure Connection Manager to automatically load the Databricks Workspaces that you have access to
  • Support for Widgets in Notebooks similar to Databricks using <strong>dbutils.widgets</strong> library
  • Added support for <strong>_sql_df variable in notebooks when mixing Python and SQL cells
  • Added support for <strong>%run</strong> and <strong>dbutils.notebook.run()</strong>
  • Preparations to make the whole extension also run via vscode.dev but there also need to be some changes made on the Databricks side for this to finally work
  • A lot of bug fixes and minor other features

All these improvements together allow you to run most of the code that you currently have in Databricks also from VSCode without any changes! Also the sync between your local files and the Databricks workspace is super easy. You can almost start a new Databricks project without ever opening the Databricks web UI!

Here is a little demo to demonstrate what the Databricks Power Tools can do for you!

We finally got your attention? Great!
Make sure to download the new Databricks Power Tools and try them on your own!
Any feedback is very welcome and if you are as passionate about it as we are you might also want to contribute to the project!

Databricks VSCode Extension – Release v1.0!

As you probably know from my previous posts, my colleagues at paiqo.com and I are constantly working to improve our VSCode extension for Databricks. Almost every month we silently release a new version to the VSCode gallery so you get the latest features. However, as this is a special release, I am also writing a dedicated blog post for it

We are very happy to finally announce the first official release of our VSCode extension for Databricks!

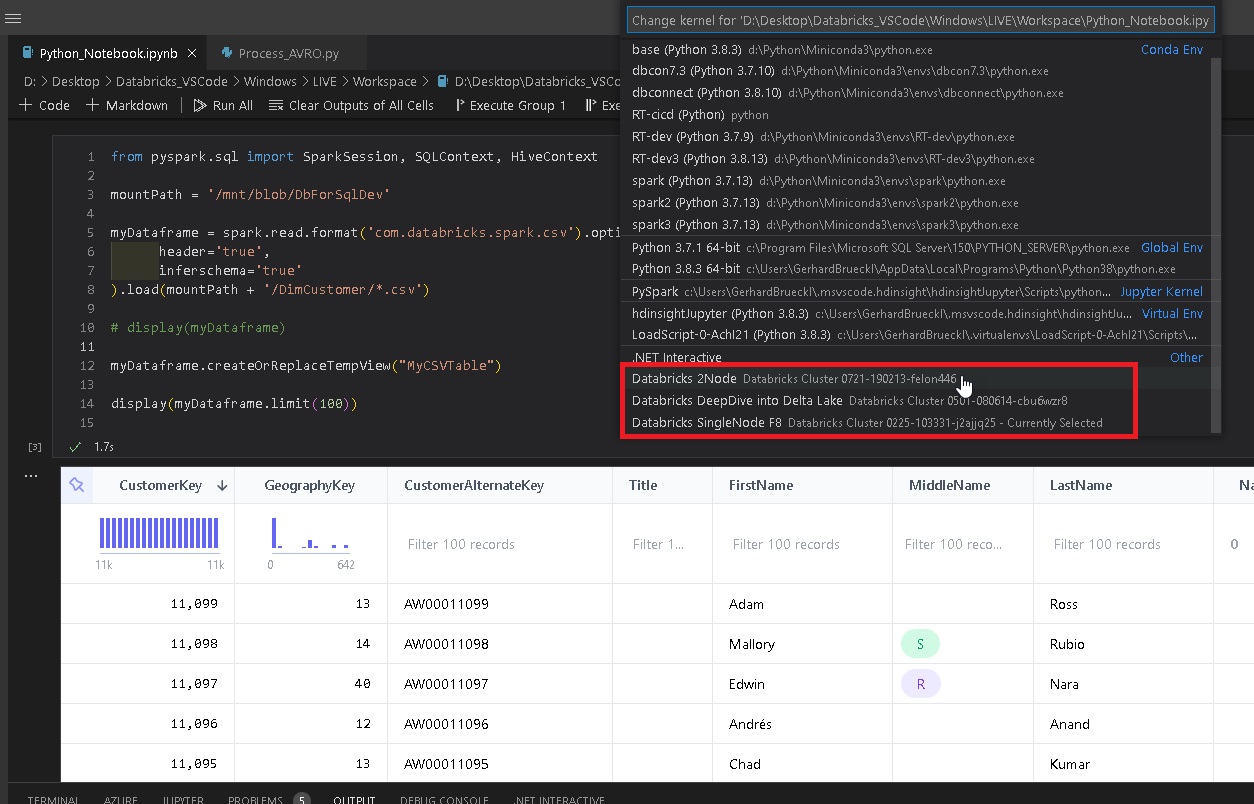
Probably the biggest and most awaited new feature is the ability to interactively execute your local Spark/SQL/Scala/R code against one of your running Databricks clusters and get the results back in VSCode! At least every 3rd issue that was opened in our Github Repo was requesting this feature and now it is finally here. It integrates seamlessly into VSCode notebooks by automatically creating a new kernel for every active Databricks cluster in your workspace. So just open one of your notebook, select the Databricks cluster kernel and start working!

Integrating it natively with VSCode notebooks brings some very nice features out of the box:

  • leverages all other extensions that work with Python or notebooks:
    syntax highlighting, auto-completion, colored indention levels (e.g using indent-rainbow)
  • use custom renderers to visualize your tables (e.g. vscode-data-tables)

In addition to all the features already mentioned above, it also solves some issues that you may had with other solutions like databricks-connect (which is also deprecated by now). The following things also work with the new Databricks VSCode notebook kernel:

  • full access to the DBFS including mountpoints
  • most dbutils functions like dbutils.secrets
  • magics like %pip, %md and all language-specific magics

However, besides all those great new features and capabilities, there are also some things that still need improvement. Here is a list of known issues:

  • widgets are currently not supported – that’s our highest priority at the moment
  • features from files-in-repos are not yet supported
  • only works with .ipynb files
  • the notebook sometimes opens twice
  • found any other issues? report them at at issues-page

All further details can be found in the README.md of the Github repository.

Let us know what you think of and provide some feedback! If you already had an older version of the extension installed, it will update automatically. If you have not used it yet, just install it directly via the VSCode extensions or download it from the VSCode gallery or our GitHub repository:

VS Code gallery: paiqo.Databricks-VSCode
Github repository: Databricks-VSCode

Using Power BI Field Parameters to translate Data and Values

When building an enterprise reporting solution with Power BI, a question that always comes up is how to handle translations. Large enterprises operate in various countries where people also speak different languages. So a report should be available in all frequently used languages. Ideally, you just create a report once and then a user can decide (or it is decided for him) in which language the report is displayed.

Power BI only partially supports this scenario and the closest we could get *before field parameters* were introduced is already very well described by Chris Webb’s blog post on Implementing Data (As Well As Metadata) Translations In Power BI – a must-read if you need to deal with translations in Power BI. Another good read on the topic is the blog post Multilingual Reports in Power BI from PBI Guy.

As you will quickly realize, the translation of metadata is already pretty easy as it is baked into the engine. Unfortunately this is not the case when you need to translate actual data values (e.g. product names, …). In the multidimensional version of Analysis Services this just worked like a charm as it was also a native feature but this feature never made it to Analysis Services Tabular Models, Azure Analysis Services or Power BI.

The current approaches when it comes to data and value translations are more workarounds than actual solutions. They probably work fine for small data models and very specific use-cases but usually fall short in performance, usability or maintainability when implemented on a larger scale enterprise models.

The recently introduced Field Parameters in Power BI give us a bit more flexibility here and another potential solution to implement data and value translations in Power BI.

Here is what we want to achieve:

  • create a single report only
  • support for multiple languages – metadata and column data
  • only minor changes to the existing data model

How can Field Parameters help here?

Field Parameters allow you to select the columns you want to display in your report/visual on-the-fly. Based on the selection, the reporting engine decides which physical column(s) it needs to use in the query it generates and sends to the data model.
So we can create a Field Parameter for the different columns that hold the translated data values and already easily switch the language by changing the selection of our Field Parameter. This is how our Filed Parameter would be defined:

Translated ProductName = {
    ("product name", NAMEOF('DimProduct'[EnglishProductName]), 0, "en-US"),
    ("nom du produit", NAMEOF('DimProduct'[FrenchProductName]), 1, "fr-FR"),
    ("nombre de producto", NAMEOF('DimProduct'[SpanishProductName]), 2, "es-SP")
}

I did this for all the fields for which translated values are actually provided. Usually this is just a very small subset of all the available columns!

Translated MonthOfYear = {
    ("MonthName", NAMEOF('DimDate'[EnglishMonthName]), 0, "en-US"),
    ("mois de l'année", NAMEOF('DimDate'[FrenchMonthName]), 1, "fr-FR"),
    ("mes del año", NAMEOF('DimDate'[SpanishMonthName]), 2, "es-SP")
}

Translated DayOfWeek = {
    ("Day Of Week", NAMEOF('DimDate'[EnglishDayNameOfWeek]), 0, "en-US"),
    ("jour de la semaine", NAMEOF('DimDate'[FrenchDayNameOfWeek]), 1, "fr-FR"),
    ("día de la semana", NAMEOF('DimDate'[SpanishDayNameOfWeek]), 2, "es-SP")
}

As you can see, Field Parameters allow you to translate the metadata (first value) and also to define the column to use for the data values (second value, using NAMEOF() function).

To change all field parameters at once I introduced an additional 4th column that holds the culture/language of the current row which is then linked to another static DAX table that is defined as follows:

Language = DATATABLE("Culture", STRING, {{"en-US"}, {"fr-FR"}, {"es-SP"}})

Then relationships are set up between these tables:

In your report you can now simply use the column from the field parameters and add a slicer for the Language table to control which language is displayed. Note: this must be a single-select slicer as otherwise Power BI will build a hierarchy of the different languages!

Here is the final result:

(please use Full Screen mode from bottom right corner)

As you can see, we just created a single report that supports multiple languages for both, metadata and data values, allows you to easily switch between them and provides similar performance as if you would have built the report for a single language only!

There are still some open questions when it comes to translating all the labels used on the whole report which is already partially covered in the other blog posts referenced above but this approach brings us another step further to a fully translatable report.

Another nice feature of this approach is that you can also put security on top of the Language/Culture table so a user only sees exactly one row – the one with the language/culture of his choice or country. So a user would not even need to select the language but it would be selected for him automatically!
Ideally you could even use the USERCULTURE() DAX function but unfortunately this is currently not supported in the PBI service. There is already an open idea for which you can vote if this is important to you.
USERCULTUER() DAX function is now finally general available also in the service: https://powerbi.microsoft.com/en-us/blog/userculture-dax-function-now-supported-in-power-bi-premium/

The .pbix file can be downloaded here: PBI_Translations.pbix

Automating the Extraction of BIM metadata from PBIX Files using CI/CD pipelines

The latest updates can always be found in the

PowerBI.CICD repository

In the past I have been working on a lot of different Power BI projects and it has always been (and still is) a pain when it comes to the deployment of changes across multiple tiers(e.g. Dev/Test/Prod). The main problem here being that a file generated in Power BI desktop (</mark>.pbix<mark style="background-color:#ffffff" class="has-inline-color has-black-color">) is basically a binary file and the metadata of the actual data model (BIM) cannot be easily extracted or derived. This causes a lot of problems upstream when you want to automate the deployment using CI/CD pipelines. Here are some common approaches to tackle these issues:

  • Use of Power BI deployment pipelines
    The most native solution, however quite inflexible when it comes to custom and conditional deployments to multiple stages
  • Creation a Power BI Template (.pbit) in addition to your .pbix<mark style="background-color:#ffffff" class="has-inline-color has-black-color"> file and check in both
    This works because the </mark></mark><mark style="background-color:#ffffff" class="has-inline-color">.pbit</mark><mark style="background-color:#ffffff" class="has-inline-color has-black-color"><mark style="background-color:#ffffff" class="has-inline-color has-black-color"> file basically contains the BIM file but its creation is also a manual step
  • Extraction of the BIM file while PBI desktop is still running (e.g. using Tabular Editor)
    With the support of external tools this is quite easy, but is still a manual step and requires a 3rd party tool
  • Development outside of PBI desktop (e.g. using Tabular Editor)
    Probably the best solution but unfortunately not really suited for business users and for the data model only but not for the Power Queries

As you can see, there are indeed some options, but none of them is really ideal, especially not for a regular business user (not talking about IT pros). So I made up my mind and came up with the following list of things that I would want to see for proper CI/CD with Power BI files:

  • Users should be able to work with their tool of choice (usually PBI desktop, optional with Tabular Editor or any other 3rd party tool)
  • Automatically extracting the metadata whenever the data model changes
  • Persisting the metadata (BIM) in git to allow easy tracking of changes
  • Using the persisted BIM file for further automation (CD)

Solution

The core idea of the solution is to use CI/CD pipelines that automatically extracts the metadata of a .pbix file as soon as it is pushed to the Git repository. To do this, the .pbix file is automatically uploaded to a Power BI Premium workspace using the Power BI REST API and the free version of Tabular Editor 2 then extracts the BIM file via the XMLA endpoint and push it back to the repository.

I packaged this logic into ready-to-use YAML pipelines for Github Actions and Azure DevOps Pipelines being the two most common choices to use with Power BI. You can just copy the YAML files from the PowerBI.CICD repository to your own repo. Then simply provide the necessary information to authentication against the Power BI service and that’s it. As soon as everything is set up correctly. the pipeline will automatically create a .database.json for every PBIX file that you upload (assuming it contains a data model) and track it in your git repository!

All further details can be found directly in the repository which is also updated frequently!